
Edmund the owl is named after such a figure, if less physically than morally strong, from Jane Austen's fantastic novel, Mansfield Park. It's not a bad movie, either.
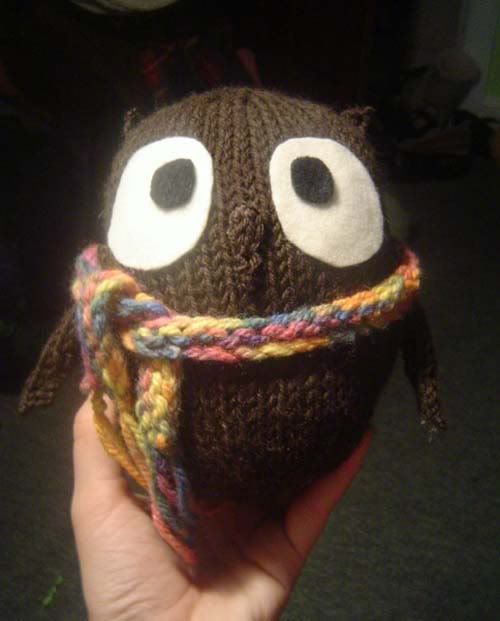
Here is Edmund. I suppose he is rather owlish. Edmund from the BBC version is more of a llama, and ironically, I have been keen to knit an andean llama purse. Anyway...

Here is Edmund the owl! I love his scarf, though it is not very eighteenth century. Maybe I should knit him an ascot and a military jacket.
I will type up a pattern soon, but seeing as it is 2:30 in the morning, I should probably go to bed.
---
EDIT
Here is the pattern.
Edmund the Owl
Edmund’s body is worked in the round on double-pointed needles, His eyes, wings, ears, and beak are made separately and stitched on later.
Materials
120 yards of worsted weight yarn, brown in color, (I just used some scrap yarn, lion wool possibly)
size 8 double-pointed needles
size 8 straight needles
fiberfill
tapestry needle
sewing needle
stitch marker
felt (cream colored and black colored)
Thread (cream colored and black colored)
Small amount of contrasting color (for scarf, optional)
Body
Using double-pointed needles, CO 6 sts. Place marker and join into the round.
Increase each stitch of first round (12 sts)
Knit 1 round.
Repeat first 2 rounds (24 sts)
(Knit 1, Increase 1) around (36 sts)
Knit 1 round.
Repeat previous 2 rows (54 sts)
Knit until piece measures 6 ½ inches long. (You can make him shorter or taller as you wish)
Now would be a good time to firmly stuff the bottom of Edmund with fiberfill. Take your time and make sure Edmund is stuffed to perfection. He should be a vertical oval shape. Stuff to the top, near your knitting needles. Remember you can add more fiberfill to stuff the top as you knit it.
K1, k2tog (Knit I, knit two together) around (36 sts)
Knit one round
Repeat previous 2 rounds (24 sts, stuff the top as you need it)
K2tog (knit 2 together) around (12 sts)
Knit one round.
Repeat previous 2 rounds (6 sts)
Cut 5 inches of yarn from the end. Using the tapestry needle, thread it through the remaining 6 stitches, pull tight, and knot.
Wings (make 2)
Using straight needles, cast on 6 sts.
Work 10 rows in stockinette stitch.
Row 11 – K2tog, knit until 2 remain, K2tog (4 sts)
Row 12-14 – Purl 1 row, Knit 1 row, Purl 1 row.
Row 15 – K2tog across row (2 sts)
Cut yarn, thread through last two stitches, pull tight and knot.
Ears (make 2)
Using straight needles, CO 4.
Purl 1 row
K2tog, knit rest of row (3 sts)
Purl 1 row
K2tog, knit last stitch.
Cut yarn, thread through last two stitches, pull tight and knot.
Beak
Using straight needles, CO 2 stitches.
Increase stitches across row (4 sts)
Purl 1 row
K1, K2tog, K1 (takes up entire row – 3 stitches.
Purl row.
Cut yarn, thread through last three stitches, pull tight and knot.
Scarf
To make the scarf I think I cast on about 60 stitches and knit 2 rows before binding off. To make a neater-looking scarf, cast on 4 or 5 stitches, and knit until desired length. It’s up to you, make him your own. J
Finishing
Cut out two larger cream colored ovals from the felt, and two small black circles, in proportion to the picture below. Sew them into place using the needle and thread. Using the tapestry needle and yarn, sew on the wings, ears, and beak according to the picture below.
If you have any questions (which I expect, seeing as this was quite a finicky pattern) feel free to ask. Enjoy your cuddly new owl!


10 comments:
i love this owl! the only problem is that he looks a bit small. do you have any recommendations on making him a big bigger, say 16-18 inches tall?
thanks for sharing this wonderful pattern! i made my own little edmund: http://www.flickr.com/photos/penny-dreadful/2355793756/
he enjoys cashews and tea.
He is so cute! :)
this is a great pattern!!!!
Thanks for sharing so many wonderful patterns - it's really generous of you and your stuff is so cute! I can't wait to try this little owl out.
So cute! Can I link to you?
That's relatively amazing! I'm a an amatuer knitter, but I think I'll give it a try. :)
Great pattern!! A couple if days ago i had a bad day and for some reason i just wanyed to knit an owl. Thi pattetn is great and i am still working on him, i habe many projects going on currently. Gret pattern, thanks so much for sharing!
Making habbo credits
is the old question : Honestly there is no fast way to make lots of habbo gold. Sadly enough a lot of the people that all of a sudden come to with millions of habbo coinsalmost overnight probably duped . Although there are a lot of ways to make lots of cheap habbo credits here I will tell you all of the ways that I know and what I do to buy habbo gold.
As a new player , you may need some game guides or information to enhance yourself.
hero gold is one of the hardest theme for every class at the beginning . You must have a good way to manage yourhero online gold
.If yor are a lucky guy ,you can earn so many hero online money by yourself . But if you are a not , I just find a nice way to get hero money. If you need , you can buy hero gold
at our website . Go to the related page and check the detailed information . Once you have any question , you can connect our customer service at any time .
I have several friends who have requested that I make them their own Edmunds, but I have one problem. The pattern is absolutely wonderful, but I would love it if you could measure gauge. Is that at all possible?
Anyway, Edmund himself is adorable.
I'm enjoying working on this pattern and I can't wait to see the full results!
I had a question for future reference though~
At the beginning with the added stitches i seem to have problems with the knitting pulling into a few pencil-sized holes just at the bottom middle. Do I need to pull the increases tighter or something?
Post a Comment